Gluten Free Cannoli Recipe: An Incredible Ultimate Dessert with 8 Steps
Gluten Free Cannoli Recipe is a delightful treat that combines creamy, sweet filling with crispy, delicious shells. For those who crave the classic Italian dessert without the gluten, this incredible recipe is a game changer. Cannoli are traditionally made with a wheat-based pastry shell, but with this gluten-free version, you can enjoy the same rich flavors without any gluten.
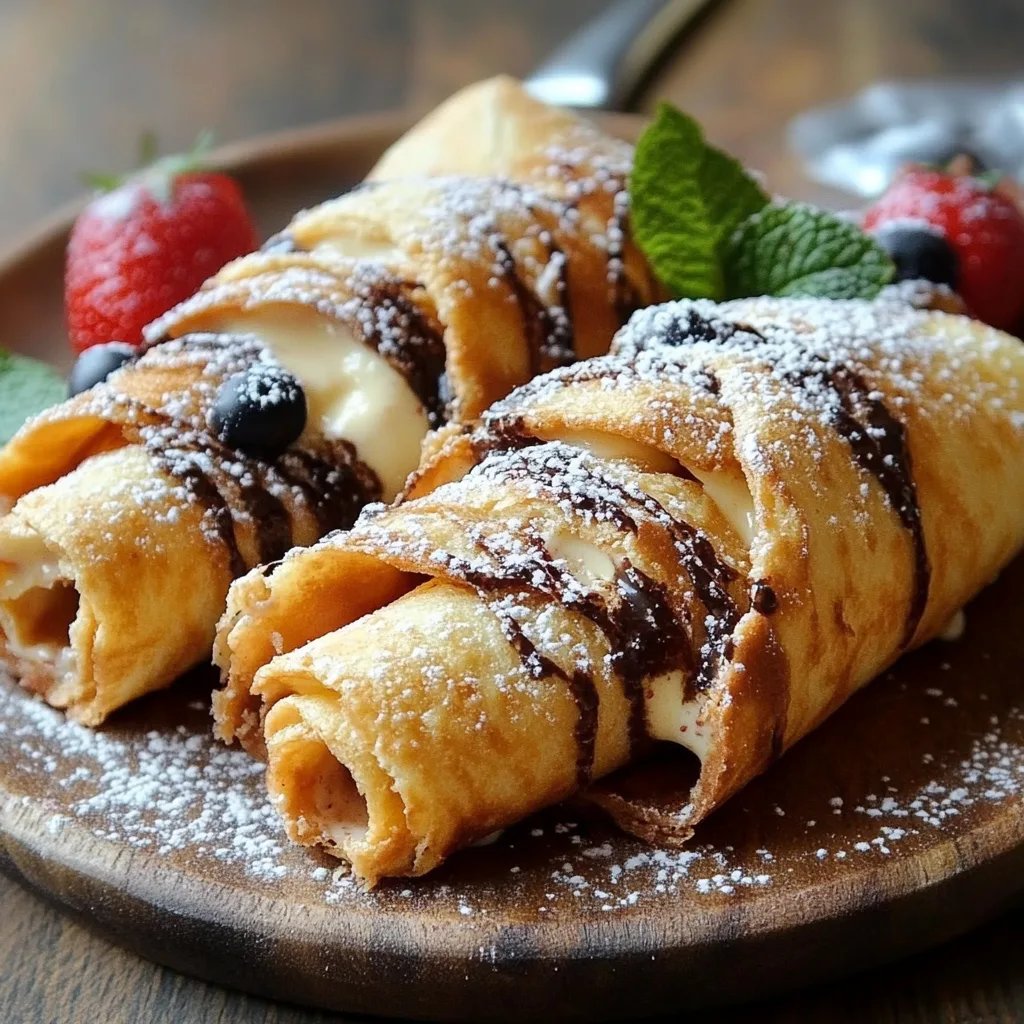
Imagine the joy of biting into a perfectly crispy shell, filled with a rich ricotta mixture and perhaps adorned with chocolate chips or candied fruit. Whether you're gluten intolerant or simply looking to try something new, this cannoli recipe will impress everyone.
The versatility of cannoli is one of the reasons you'll love this dessert. You can customize the filling and toppings to suit your taste. Plus, the crispy texture combined with the smooth, sweet filling makes for a truly wonderful experience. In this guide, we'll delve into why this gluten-free cannoli recipe stands out, how to prepare it, and share handy serving tips. Let's explore the exciting world of gluten-free baking with cannoli!
Why You’ll Love This Recipe
The Gluten Free Cannoli Recipe offers a blend of Italian tradition and modern dietary needs. Below are key reasons to love this delightful treat:
- Gluten-Free Option: Finally, a cannoli recipe that everyone can enjoy without worry about gluten.
- Decadent Filling: The rich ricotta filling can be flavored with vanilla, lemon zest, or even chocolate, making it a flavor powerhouse.
- Simple Ingredients: Most ingredients are readily available, and you may already have them in your kitchen.
- Impressive Appearance: Beautifully presented, these cannoli can impress at any gathering or as a special dessert.
- Versatility: You can tailor the toppings and fillings to suit various tastes, making it perfect for different occasions.
- Easy Instructions: Though the process may seem complex, our step-by-step guide ensures you achieve success without hassle.
- A Perfect Party Treat: Whether it's a holiday, birthday, or family reunion, these cannoli fit right in.
- Memory of Italy: Evoke the flavors of a traditional Italian pastry shop with each bite.
Embrace the joys of baking gluten-free desserts without sacrificing flavor or texture. This cannoli recipe promises to bring smiles to everyone at your table!
Preparation and Cooking Time
Preparing your Gluten Free Cannoli will take approximately 1 hour and 30 minutes, which includes preparation, cooking, and cooling time. Here’s a breakdown for your convenience:
- Preparation Time: 30 minutes
- Cooking Time: 30 minutes
- Cooling Time: 30 minutes
These times may vary based on your kitchen setup and experience, but they provide a solid guideline for creating delicious cannoli!
Ingredients
- For the Shells:
- 1 ½ cups gluten-free all-purpose flour
- 1 tablespoon granulated sugar
- 1 tablespoon cocoa powder
- ½ teaspoon cinnamon
- ¼ teaspoon salt
- 1 large egg, beaten
- 2 tablespoons unsalted butter, melted
- 2 tablespoons white wine (or vinegar)
- Oil for frying
- For the Filling:
- 2 cups ricotta cheese, drained
- 1 cup powdered sugar, sifted
- 1 teaspoon vanilla extract
- ½ teaspoon lemon zest
- ½ cup mini chocolate chips (optional)
- For Garnish:
- Chopped pistachios or mini chocolate chips (optional)
- Extra powdered sugar for dusting
Step-by-Step Instructions
Creating your Gluten Free Cannoli can be straightforward if you follow these simple steps:
For the Shells:
- Combine Dry Ingredients: In a mixing bowl, whisk together the gluten-free flour, granulated sugar, cocoa powder, cinnamon, and salt.
- Mix Wet Ingredients: In a separate bowl, blend the beaten egg, melted butter, and white wine until well combined.
- Form Dough: Gradually add the wet ingredients to the dry ingredients, mixing until a dough forms. It should be firm yet pliable.
- Chill the Dough: Cover the dough in plastic wrap and refrigerate for about 30 minutes. This helps in easy rolling later.
- Prepare for Frying: Heat the oil in a deep pan over medium heat. Make sure there is enough oil to fully submerge the cannoli shells.
- Roll out Dough: On a gluten-free floured surface, roll out the chilled dough to about 1/8 inch thick.
- Cut Circles: Use a round cutter or glass to cut out circles, about 4-5 inches in diameter.
- Wrap Cylinders: Wrap each circle around a metal cannoli tube, sealing the edges with a bit of water.
- Fry Shells: Fry the wrapped tubes in the hot oil until golden brown, about 2-3 minutes.
- Cool and Remove: Once done, allow the shells to cool slightly before carefully removing the tubes. Let them cool completely on a wire rack.
For the Filling:
- Prepare Ricotta Mixture: In a bowl, combine the drained ricotta cheese, powdered sugar, vanilla extract, and lemon zest. Mix until smooth and creamy.
- Add Chocolate Chips: If desired, fold in the mini chocolate chips into the filling for added texture and flavor.
- Fill Shells: Using a piping bag or a spoon, fill each cooled cannoli shell with the ricotta filling.
- Garnish: Dip the ends in chopped pistachios or mini chocolate chips for added flair. Dust with powdered sugar before serving.
These steps will guide you in effortlessly creating these amazing gluten-free cannoli that everyone will love!
How to Serve
When it comes to serving your Gluten Free Cannoli, consider the following to enhance the experience:
- Presentation: Use a beautiful platter to arrange the cannoli. A simple yet elegant design will elevate the look.
- Accompaniment: Serve alongside fresh fruit or a scoop of gelato for a refreshing contrast.
- Temperature: Cannoli are best served at room temperature, so allow them to sit for a while after filling.
- Smaller Portions: Cut them into smaller servings if desired. This encourages guests to enjoy just one more!
- Extra Toppings: Provide additional toppings on the side, such as chocolate sauce or whipped cream, so guests can customize their dessert.
- Coffee Pairing: Cannoli pair beautifully with a cup of coffee or espresso, making for a perfect Italian-inspired end to your meal.
By thoughtfully presenting and serving your Gluten Free Cannoli, you can create a memorable dessert experience that delights both the eyes and the palate!
Additional Tips
- Use Quality Ingredients: To improve flavor, always use high-quality ricotta cheese and fresh citrus zest.
- Chill Before Serving: Let the filled cannoli sit in the fridge for about 30 minutes before serving. This helps the flavors meld together.
- Fill Just Before Serving: For the crispiest shells, fill them shortly before enjoyment to avoid sogginess.
- Experiment with Fillings: Don't hesitate to add spices like nutmeg or variations such as mascarpone for a different twist.
- Avoid Overheating Oil: Ensure that your frying oil is at the right temperature. Too hot can burn the shells, while too cool will make them greasy.
Recipe Variation
There are many ways to get creative with your Gluten Free Cannoli. Here are some suggestions:
- Chocolate Pastry Shells: Incorporate cocoa powder into the shell dough for an extra chocolatey experience.
- Fruit-Centric Filling: Mix in diced strawberries or blueberries into your ricotta mixture for a fruity burst of flavor.
- Lemon Ricotta Filling: For a refreshing twist, add more lemon zest and a squeeze of lemon juice into the filling mixture.
- Nutty Delights: Fold crushed walnuts or almonds into the filling for added texture and flavor.
- Vegan Version: Substitute the ricotta with a vegan cream cheese alternative and use a plant-based butter for the shells.
Freezing and Storage
- Storage: Keep any filled cannoli in the fridge and consume within 24 hours for the best texture and flavor.
- Unfilled Shells: You can store leftover unfilled shells in an airtight container at room temperature for up to a week.
- Freezing: If you have leftover unfilled shells, freeze them in a single layer. Once solid, store them in a freezer-safe bag for up to two months. Fill them fresh when you want to enjoy!
Special Equipment
For successful creation of your Gluten Free Cannoli, certain equipment can help:
- Cannoli Tubes: Essential for shaping your shells; they come in various sizes.
- Deep Fryer or Heavy Pot: For frying your shells evenly at the correct temperature.
- Mixing Bowls: Use a few of various sizes for mixing ingredients conveniently.
- Piping Bag: Handy for filling the cannoli with precision.
- Wire Rack: Great for cooling your fried shells properly to keep them crispy.
Frequently Asked Questions
Can I make cannoli shells ahead of time?
Yes, you can prepare the shells in advance and store them in an airtight container.
What if I don't have cannoli tubes?
You can use any cylindrical object that’s safe for frying, such as a clean empty soda can.
Is there a gluten-free substitute for ricotta?
Absolutely! You could try a dairy-free version such as cashew cream blended to a ricotta-like consistency.
How do I know when my oil is at the right temperature to fry?
You can check by dropping a small piece of dough in; if it sizzles and rises, the oil is ready.
Can I bake the shells instead of frying?
While frying gives the classic texture, you can bake the shells at 400°F (200°C) for about 10-15 minutes, but keep an eye on them.
Conclusion
This Gluten Free Cannoli Recipe is an exceptional dessert that combines the traditional flavors of Italy with modern dietary needs. With its crispy shells and rich filling, it is a delightful treat that everyone can enjoy. Each bite transports you to an authentic Italian pastry shop, making it perfect for any occasion. Through simple steps, you’ll master making these classic desserts without gluten, impressing your friends and family alike. So, gather your ingredients and get ready to indulge in these scrumptious gluten-free delights!