Reese's Peanut Butter Cup Cake: An Incredible Ultimate Recipe
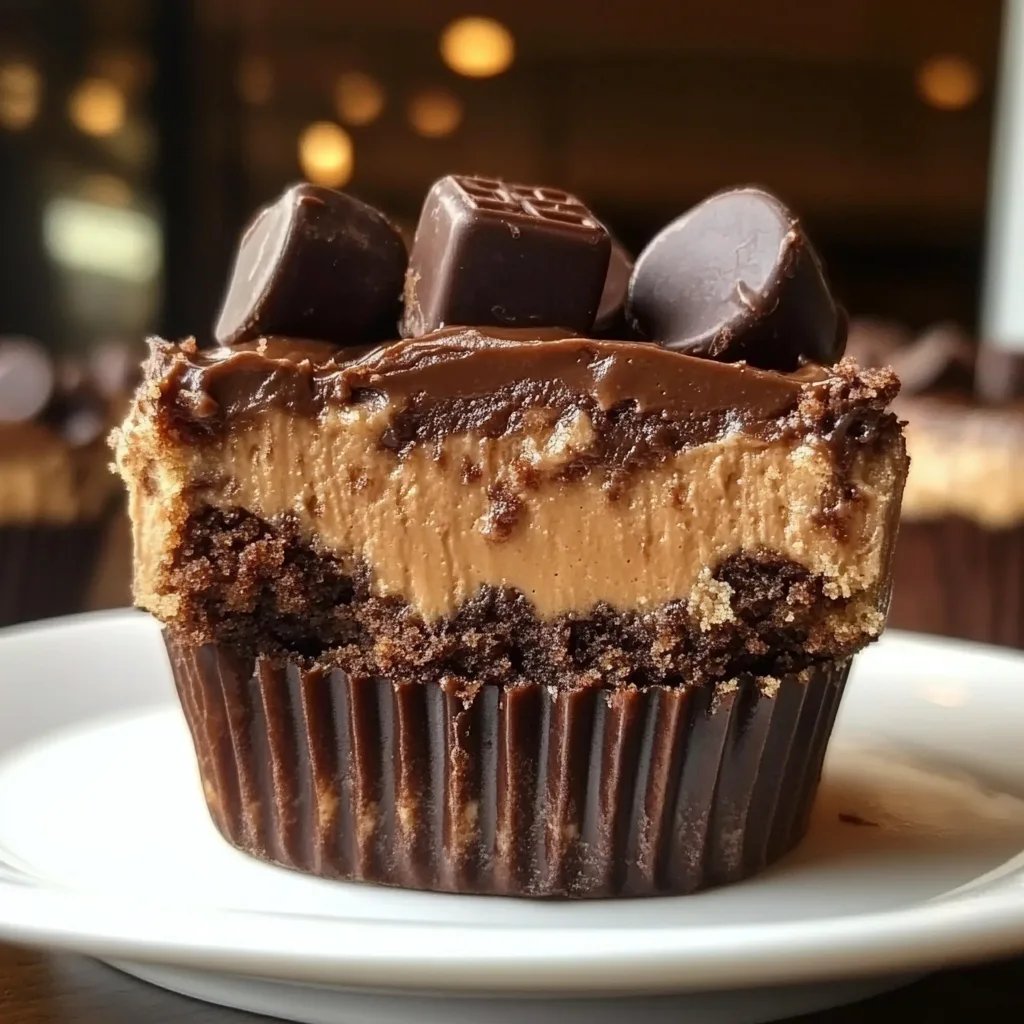
Reese's Peanut Butter Cup Cake is a delightful dessert that combines the beloved flavors of chocolate and peanut butter into a single, spectacular cake. Imagine biting into a moist chocolate layer, only to discover creamy peanut butter frosting and chunks of Reese's cups throughout. This dessert is not just a treat; it’s an experience sure to leave an impression on everyone who tries it. Whether you're celebrating a birthday, hosting a dinner party, or just satisfying your sweet tooth, this cake promises to be the highlight of the occasion.
If you’ve ever indulged in a Reese's Peanut Butter Cup, you already know the blissful combination of sweet and salty. This cake captures that essence perfectly, making it an absolute favorite among dessert lovers. It's easy to prepare and requires minimal skills, making it perfect for both novice bakers and experienced pastry chefs alike. This guide will walk you through everything you need to know about making the ultimate Reese's Peanut Butter Cup Cake, including why it's so highly regarded, how long it takes to make, and how to serve it beautifully.
Each layer of this cake is iced with a rich, creamy peanut butter frosting, and topped generously with chopped Reese's cups, creating a visual feast that is as delicious as it looks. The first forkful delivers not only a taste explosion but also a nostalgic wave of joy for fans of Reese's products. In this enticing article, you’ll discover why this cake is an incredible addition to your dessert repertoire.
Why You’ll Love This Recipe
Reese's Peanut Butter Cup Cake is more than just a dessert; it's a celebration of flavors and textures that play off one another beautifully. Here are some reasons why you’ll fall in love with this amazing recipe:
- Delicious Flavor Combination: The rich chocolate cake combined with creamy peanut butter frosting is pure bliss.
- Crowd-Pleaser: This cake is a guaranteed hit at parties and gatherings, pleasing both adults and children alike.
- Easy to Make: The step-by-step instructions ensure that even beginners can create a show-stopping dessert.
- Versatile Presentation: You can customize the toppings and plating to suit any occasion, from birthdays to casual get-togethers.
- Decadent Indulgence: Each slice is a rich treat, making it perfect for satisfying sweet cravings.
- Memorable Experience: Sharing this cake will undoubtedly lead to memorable moments around the dining table.
These points highlight why Reese's Peanut Butter Cup Cake is a must-try. The blending of rich, creamy, and crunchy elements brings a unique experience that calls for celebration and sharing.
Preparation and Cooking Time
In total, preparing the Reese's Peanut Butter Cup Cake will take about 1 hour and 30 minutes. Here’s a breakdown of the time required:
- Preparation Time: 30-40 minutes
- Cooking Time: 30-35 minutes
- Cooling Time: 15-20 minutes
These estimated times may vary based on your kitchen setup and experience level, but they provide a good framework to help you plan accordingly.
Ingredients
- 1 ¾ cups all-purpose flour
- 1 ¾ teaspoons baking powder
- 1 teaspoon baking soda
- ½ teaspoon salt
- ¾ cup unsweetened cocoa powder
- 1 cup granulated sugar
- ½ cup brown sugar, packed
- 1 cup whole milk
- ½ cup vegetable oil
- 2 large eggs
- 1 teaspoon vanilla extract
- 1 cup boiling water
- 1 ½ cups creamy peanut butter
- 3 cups powdered sugar
- ½ cup unsalted butter, softened
- 1 teaspoon vanilla extract (for frosting)
- 1-2 cups chopped Reese's Peanut Butter Cups (for topping)
Step-by-Step Instructions
Creating the Reese's Peanut Butter Cup Cake is straightforward if you follow these simple steps:
- Preheat the Oven: Preheat your oven to 350°F (175°C) and grease two 9-inch round cake pans.
- Mix Dry Ingredients: In a large bowl, sift together flour, baking powder, baking soda, salt, cocoa powder, granulated sugar, and brown sugar.
- Combine Wet Ingredients: In another bowl, whisk together milk, vegetable oil, eggs, and vanilla extract until well combined.
- Add Mixtures Together: Gradually add the wet mixture into the dry mixture, stirring until everything is fully incorporated.
- Add Boiling Water: Carefully stir in the boiling water. The batter will be thin, but this helps create a moist cake.
- Divide Batter: Pour the batter evenly into the prepared cake pans.
- Bake: Place the pans in the preheated oven and bake for 30-35 minutes, or until a toothpick inserted in the center comes out clean.
- Cool the Cakes: Remove the pans from the oven and let the cakes cool in the pans for about 15 minutes. Then, transfer them to wire racks to cool completely.
- Make Frosting: In a mixing bowl, beat together peanut butter, softened butter, vanilla extract, and powdered sugar until the mixture is smooth and creamy.
- Frost the Cake: Once the cakes are completely cooled, place one layer on a serving plate and spread a generous layer of frosting on top.
- Layer and Ice: Place the second cake layer on top and frost the top and sides of the entire cake.
- Add Toppings: Decorate the top of the cake with chopped Reese's Peanut Butter Cups for an added crunch and flavor explosion.
These steps will guide you in creating this incredibly delicious cake effortlessly.
How to Serve
To make the experience of enjoying Reese's Peanut Butter Cup Cake even more special, consider these serving tips:
- Presentation: Use a decorative cake stand that highlights the cake's layers and toppings.
- Garnish: Add a drizzle of melted chocolate or additional chopped Reese's on top before presenting to guests.
- Ideal Portion Sizes: When slicing, opt for generous portions but encourage guests to come back for seconds. Smaller slices allow everyone to enjoy without feeling overwhelmed.
- Beverage Pairing: This cake pairs wonderfully with a glass of cold milk, coffee, or even a scoop of vanilla ice cream for added decadence.
- Serving Temperature: Serve at room temperature to ensure the frosting maintains its creamy texture.
By keeping these tips in mind, you can elevate the serving experience of your Reese's Peanut Butter Cup Cake, impressing your guests and creating a dessert atmosphere that everyone will remember.
Additional Tips
- Use Quality Ingredients: Select high-quality chocolate and peanut butter for the best flavor. Good peanut butter adds richness and creaminess to the frosting.
- Layer the Cake with Care: Ensure that each layer is evenly frosted to avoid any tilt or imbalance in the overall presentation. Level the tops of the cakes if necessary.
- Chill the Frosting: If your frosting gets too soft while working with it, chill it for a bit to make it easier to spread and pipe.
- Add Texture: For an exciting crunch, consider adding chopped nuts or crushed cookies between the layers or on top of the frosting.
- Taste as You Go: Always taste your frosting and cake batter. Adjust the sweetness and peanut butter to your liking for a perfect balance.
Recipe Variation
Get creative! Here are some enjoyable variations to consider:
- Chocolate Peanut Butter Swirl: Incorporate a swirled effect in your cake batter by adding dollops of peanut butter into the chocolate batter before baking. Swirl with a knife for a beautiful marbled look.
- Gluten-Free Option: Substitute all-purpose flour with a gluten-free blend to accommodate dietary restrictions, ensuring everyone can enjoy a slice.
- Peanut Butter Cup Cheesecake Cake: Transform this recipe into a cheesecake by incorporating a layer of peanut butter cheesecake in between the chocolate cake layers.
- Dairy-Free Version: Use almond milk and dairy-free butter to make this cake suitable for dairy-sensitive individuals.
Freezing and Storage
- Storage: Keep the cake covered at room temperature for up to 3 days or in the refrigerator for about a week. Make sure to store it in an airtight container.
- Freezing: To freeze the cake, wrap individual slices tightly in plastic wrap and then in aluminum foil. It can be stored in the freezer for up to 3 months. Allow the slices to thaw in the fridge overnight when ready to enjoy.
Special Equipment
Preparing the Reese's Peanut Butter Cup Cake requires the following essential tools:
- Mixing Bowls: Use multiple sizes for mixing the batter and frosting conveniently.
- Electric Mixer: A stand mixer or hand mixer will help achieve creamy frosting and smooth batter.
- Cake Pans: Two 9-inch round cake pans will ensure even baking and layered structure.
- Offset Spatula: A flexible spatula will make frosting the cake easier and help create clean edges.
- Cooling Racks: Useful for allowing the cakes to cool evenly after baking.
Frequently Asked Questions
How do I know when the cake is done baking?
Check for doneness by inserting a toothpick in the center; if it comes out clean or with a few moist crumbs, the cake is ready.
Can I make this cake ahead of time?
Yes! You can bake the cake layers a day in advance and frost them just before serving. This can enhance the flavors.
Can I replace the creamy peanut butter with crunchy peanut butter?
Absolutely! Using crunchy peanut butter adds a delightful texture, enhancing the flavor experience.
What can I use instead of eggs?
Flax seeds, unsweetened applesauce, or a commercial egg replacer work well if you need an egg substitute.
How do I transport my Reese's Peanut Butter Cup Cake?
For transport, place it in a sturdy cake box or carrier to prevent any damage during the journey.
Conclusion
The Reese's Peanut Butter Cup Cake is more than just a dessert. It’s a declaration of love for the classic combination of chocolate and peanut butter. With its moist, rich layers and creamy frosting topped with the nostalgia of Reese's cups, this cake is bound to be a sensation at any gathering. Following this ultimate guide will help you create a showstopping cake that delights everyone who gets a taste. Get ready to impress friends and family alike with this decadent dessert—they won’t be able to resist asking for seconds!